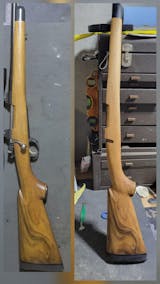
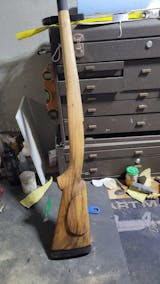
For builders using maple for their Black Powder Rifle Kits, iron nitrate offers the most authentic stain available and was the standard in the original gunmaking era. Today, it still outperforms modern dyes and stains in durability and appearance. It brings out the curl in maple, adds depth, and creates contrast that cannot be matched otherwise.
This method connects the modern builder with early American techniques while delivering a visual result that honors both form and function. In this article, we will examine what makes iron nitrate the foundational stain of choice for authentic maple Black Powder Rifle builds.
A Stain with Historical Weight
Iron nitrate has long been the main stain for curly maple gunstocks. During the colonial period, it was commonly referred to as “aqua fortis.” While the term technically means nitric acid, builders actually used it to describe the iron nitrate solution they applied to wood. This method was standard practice in original black powder rifle construction as it produced lasting color and enhanced the natural figure of maple.
Historical references to iron nitrate appear in period documents and old newspaper articles (as seen below), confirming its widespread use.

Image Source: Dixon & Hunter, eds., April 13, 1776
Additionally chemical tests on surviving antique rifles often reveal higher iron content in the finishes, further proving that iron nitrate was used, not just pure nitric acid.
What Iron Nitrate Is and Why It Works
Iron nitrate is a chemical wood stain made by combining water, diluted nitric acid (around 20% concentration), and iron. As the acid reacts with the iron, it forms iron nitrate. This reaction stops once the acid is neutralized. The resulting solution is what you apply to the wood.

What makes iron nitrate different from modern stains is that it works through a chemical reaction. When applied to wood, it reacts with the natural tannins, present in the ideal quantities in maple. This reaction produces iron oxides, which are responsible for the final color. The process goes below the surface, binding the color to the wood itself rather than coating it.
Once dry, the stained wood appears greenish-gray and dull. That’s expected. The real transformation happens when heat is applied. Heating the surface triggers the chemical change that shifts the color to a rich brown or warm brownish-orange. The result is permanent, stable, and highly resistant to fading.
Preparing and Applying
Proper preparation is critical before using iron nitrate. Start by sanding or scraping the wood surface to a clean, even texture. Next, raise the grain. Wet the surface with water, let it dry, then lightly sand to remove raised fibers. Repeat this cycle two to three times. This helps the stain absorb evenly and prevents roughness after heating.
Once the wood is prepped, apply the iron nitrate solution evenly with a brush or cloth. Make sure to cover the entire surface. Let it dry for 20 to 30 minutes. At this point, the wood will look greenish-gray and unattractive. That’s normal.

Next, apply heat using a heat gun. This step is not optional. The heat triggers the chemical reaction that changes the stain from green to a rich brown or orange-brown. Move the heat gun slowly and evenly across the surface. You must see a visible color shift. If it stays green, you haven’t heated it enough. Reheat as needed. You can even reheat through an oil finish for touch-ups, as long as it’s within a day or so.

Important Note: Avoid staining inlets or recessed areas where metal parts will go. These areas are hard to heat properly and were originally left bare. Also, iron nitrate in those spots can cause rust from residual acidity.

Done correctly, the heating process locks in the color and removes most of the remaining acidity. Iron nitrate is simple to use, but the prep and heating steps must be followed closely for the best results.
Visual Impact and Grain Enhancement
Iron nitrate brings out the full potential of curly maple. It reacts directly with the tannins in the wood, creating rich color that enhances contrast and depth. The result is a dramatic, three-dimensional look that highlights the natural figure in the grain.
This stain works especially well with curly or figured maple because of the way it absorbs unevenly across the surface. End grain areas soak up more of the solution and become darker. Side grain areas take in less and stay lighter. This difference creates the contrast that makes the curl pop. The figure looks deeper and more defined than with any modern dye or pigment stain.

Once the stained wood is heated and transformed from greenish-gray to brown, it already shows strong contrast. But when you apply an oil finish over the stained wood, the visual impact increases even more. The oil adds clarity and depth, making the curl stand out even further. The grain almost seems to move under light.
Unlike other stains, iron nitrate stays rich and vibrant over time. Builders choose it because it makes the wood come alive. The color is strong without looking artificial. The contrast looks natural and highlights the true beauty of the maple.
If your goal is to build a black powder rifle that looks authentic and refined, this is the stain that delivers. No other method brings out the grain with the same intensity, stability, or historical accuracy.
Wood Choices, Adjustments, and Cautions
Iron nitrate works best on maple, especially curly maple. The stain depends on tannin content to react and produce color. Maple has the right tannin level and grain structure to respond well. Among maple types, sugar maple tends to go lighter. Hard maple, which usually has more tannins, goes darker. Both work, but the result depends on the specific piece of wood.

Avoid using iron nitrate on cherry or walnut. Cherry turns black and walnut does not respond well. This stain is meant for maple almost exclusively (in some cases can be used with Ash Wood).
If the color turns out too dark, you can rub it back with Scotch-Brite. This removes the top layer and softens the look. To add warmth or tone, apply amber or honey brown aniline dye over the stained wood. These dyes can also be mixed into the final finish for subtle adjustment.
As a reminder, never apply iron nitrate inside inlets or recessed areas where metal parts will sit. Residual acidity can cause rust and damage to metal. It can also outgas and affect the lock or other components.
Some builders choose to neutralize the wood after staining using baking soda and water. Others skip this step, relying on proper mixing and heating to drive off residual acidity. Neutralizing won’t hurt the finish, but it may not be necessary if the stain is prepared and applied correctly.
Avoid “Magic Maple” and other chromium-based stains. They may look good at first, but they turn an ugly green over time. Stick with iron nitrate for stability and authenticity.
Iron Nitrate from Kibler’s Longrifles
At Kibler’s Longrifles, we offer a carefully prepared iron nitrate solution designed specifically for traditional gunstock finishing. It’s tested on our kits, used in our shop, and matched to historical expectations. You don’t need to mix your own or worry about concentration; just follow the instructions in this article and watch the color come to life.

If you’re building one of our kits, it’s the natural choice. If you’re working on any maple-stocked rifle, it’s still the right one. Order it with your kit or pick it up separately from our online store.


Leave a comment